You too can do printmaking with minimal supplies. And you don't have to be an expert at it to get fun, usable results. As a matter of fact, this is how we made part of our logo! We used the below method and scanned it into the computer.
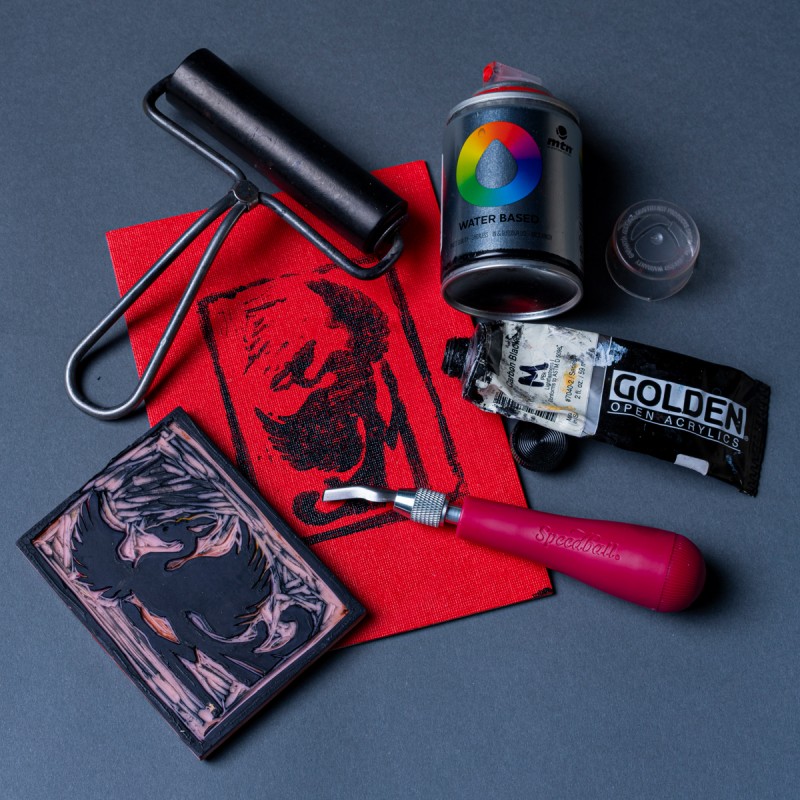
Some of the supplies you can use are as follows, but I'm sure you can come up with some great alternatives too.
First, sketch out your design on the plain paper. Don't forget to reverse your design! Otherwise, it'll be backwards on once you print. The process begins on paper because pencil doesn't mark the Easy-Carve Block well. Once you are complete, lay a piece of graphite paper down over the Easy-Carve Block and lay your design on top of it. Trace your design again and it'll appear on the block.
Tip! If you prefer not to draw your design backwards, consider using a thin paper you can see through and flip it over. Or, scan it into a computer, use a photo program to flip it, and print it again.
Once your design is on the Easy-Carve Block, it's time to carve! Using the Speedball Carving Tool Set, choose a tool and begin removing the "white space" around your design. Be careful and go slow! If this is your first time carving, you may want to do a test piece before you attempt your final, so you get the feel of the tool and how the block accepts it.
Now you have a stamp you made all on your own!
Next, prepare the surface you will print on. This can really be anything flat that will accept an acrylic paint... that's almost anything! For our example, we used a canvas, for it's texture. We used a water-based spray paint by Montana to change the paint it red. This spray paint is low odor and can be used indoors, plus, it dries quickly. (But be sure to allow it to dry completely before proceeding.)
Next, we put a few globs of Open Acrylics by Golden of paint on our stamp. We chose this paint because it is a slow drying acrylic, allowing for more working time than traditional acrylics. We then used the breyer to roll the ink across our stamp evenly, being careful to not get globs in the recessed areas.
Once inked, flip over the stamp and applied the ink, being careful to lay it down evenly and not move it around. Add a little pressure evenly across the stamp, and then pick up up evenly again.
Let the ink dry and you've got your first print! Go ahead and make a few. But be sure to use a little soap and water to wash off the excessive ink on your stamp and brayer when done before storing it.
![]()